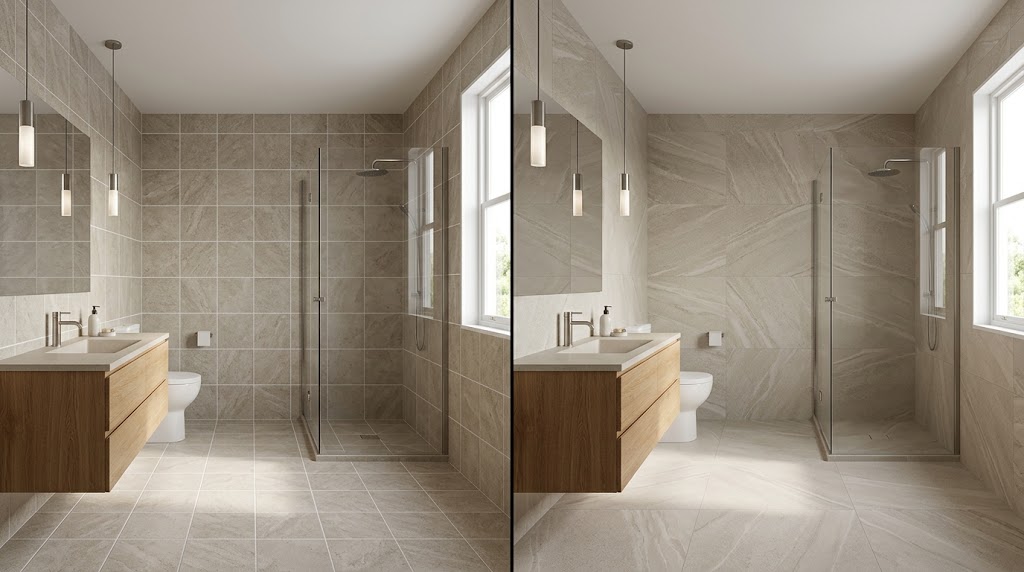
Every tile project begins with excitement and ends with either satisfaction or regret. The difference often traces back to a single, under-considered variable. It is not the shade of gray on the floor or whether the finish is matte or gloss. It is how big each piece of tile actually is.
Size determines how the surface looks when grouted, how much effort installation demands, and how the floor ages under daily use. Two broad categories dominate residential tile shopping today: standard formats and their larger counterparts. Each has clear strengths. Each has real limitations. Understanding both before you buy is the most important step in the entire process.
What Falls into Each Category?
Establishing definitions keeps the comparison focused. Standard tiles encompass the 12×12-inch square that has been a residential workhorse for decades. Smaller options like 6×6, 8×8, and rectangular formats such as 3×6 also sit comfortably in this group.
Anything stretching beyond 15 inches on at least one edge occupies the larger category. That range includes 18×18 squares, 24×24 squares, and plank formats like 12×24 or 8×36. At the upper end, full porcelain panels reach dimensions that can cover an entire wall without a single joint. Products beginning at 18 inches and above are broadly classified as large format tiles, and their adoption in residential settings has accelerated in recent years.
These categories carry practical implications that extend far beyond visual preference. Tool requirements, substrate preparation, labor hours, and even structural considerations shift as tile dimensions increase. Factoring those shifts into your decision early prevents problems that surface only after work has begun.
The Reliable Appeal of Standard Dimensions
Standard formats have not held their position in the market for generations without reason. Their practical benefits are immediate and well-proven.
Physical handling is the clearest advantage. A 12×12 tile fits in one hand, weighs very little, and positions effortlessly against spacers or layout marks. Trimming pieces around plumbing, electrical boxes, and cabinet bases requires nothing beyond a tape measure and a basic cutter. Because offcuts remain compact, they serve double duty in narrow gaps and keep overall waste manageable.
Tool requirements are minimal. A manual snap cutter handles most field and trim cuts with acceptable accuracy. A modestly priced wet saw picks up where the snap cutter leaves off. No specialty blades or industrial-grade equipment are needed to produce clean, professional-looking edges on these smaller bodies.
Rooms that are small or heavily populated with fixtures amplify these strengths. Consider a tight half-bath where the toilet, pedestal sink, and doorway consume most of the available floor. Smaller tiles adjust to those constraints with a handful of straightforward cuts rather than dozens of complex ones. The layout process stays calm and efficient.
The downside is joint count. Every additional tile placed increases the number of grout lines, and those lines form a visible grid across the finished surface. In confined rooms, that grid can look cluttered and restless. Grout also darkens as it absorbs dirt, and restoring its original appearance takes periodic effort.
The Momentum Behind Bigger Formats
Larger tile dimensions have shifted from niche trend to mainstream residential standard. Functional and aesthetic factors both contribute to that shift.
Visual openness is the headline benefit. Fewer grout lines mean fewer interruptions across the floor, creating a surface that reads as one continuous plane. This quality is particularly effective in open layouts where the floor carries the eye between living, dining, and kitchen zones. Swapping a dense grid for larger pieces often makes a familiar room feel meaningfully more spacious.
Maintenance follows the same logic. Fewer joints mean fewer recessed areas where moisture, soap scum, or kitchen splatter can accumulate. A single mop pass usually handles routine cleaning without special products or techniques. Rectified-edge versions push this further by permitting grout joints as narrow as 1/16 of an inch, which nearly eliminates visible grout from a distance.
Practical challenges, however, are real and should not be minimized. A single 24×24 porcelain tile weighs far more than a standard piece of the same material. Moving boxes up stairs or through tight passages demands careful coordination and genuine strength. One dropped tile during installation typically ends in a clean break and a wasted piece.
Where Installation Gets Demanding
The differences between these two formats crystallize during installation. Honest evaluation of your substrate and abilities is essential before starting.
Subfloor flatness is the central requirement for bigger formats. Rigid tiles do not bend or flex to follow dips and humps in the underlying surface. When a large piece spans a depression, its edges ride above the neighboring tiles — a condition called lippage. Standard tiles absorb those same irregularities by conforming to the existing floor contour without complaint.
Achieving the flatness that larger formats demand often means grinding high points or pouring self-leveling underlayment across the room. Both tasks require additional time, materials, and care. Shortcuts in this preparation phase are the most frequent source of poor results with oversized installations.
Setting technique also evolves. Back-buttering — pressing a thin layer of mortar onto the tile’s reverse before placing it — changes from a recommended practice to a mandatory one. A properly sized trowel must achieve 80 to 95 percent contact coverage under each piece. Anything beneath that threshold creates hollow spots that crack predictably under ordinary traffic.
Cutting thick, dense porcelain adds another dimension of difficulty. A wet saw equipped with a continuous rim diamond blade is the minimum workable tool. Snap cutters routinely fracture dense porcelain rather than scoring it cleanly. If blade selection feels overwhelming, the staff at a ceramic tile shop can point you toward models rated for your tile’s body and thickness.
What the Project Actually Costs
The retail price per square foot accounts for only a portion of your real expenditure.
Oversized formats carry higher material costs from the outset. The steeper expense, though, typically appears in professional labor charges. Installers command premium rates because flatness prep and careful placement extend the timeline meaningfully. The precision needed to achieve a lippage-free finish across a broad surface justifies that premium.
DIY installers face cost pressures of their own. Renting or buying a wet saw that handles thick porcelain adds a serious budget line. Breakage during the learning phase is nearly guaranteed, making surplus material a smart financial decision. A knowledgeable ceramic tile shop can help you determine an appropriate waste factor for your layout and tile size.
Standard formats keep the financial picture stable. Inexpensive tools, low waste rates, and a forgiving margin for error produce predictable costs from the first box through the final grout pass. When money is tight, that reliability is a significant and welcome advantage.
Choosing What Fits
Three variables should guide the decision: the space, the budget, and the skill set of the person doing the work.
Evaluate the room’s shape and scale first. Wide living rooms, spacious master suites, and long hallways benefit from the uninterrupted quality of bigger formats. Small bathrooms, galley kitchens, and rooms dense with fixtures work better with standard dimensions. Tile size should feel proportional to the room it occupies.
Consider who is handling the installation next. First-time tilers build competence faster with standard formats that forgive minor spacing errors and imprecise measurements. A visit to a ceramic tile shop with room dimensions and a few photographs gives staff enough context to steer you toward a sound choice. When working with a professional, ask them to inspect the subfloor before you commit to materials.
Structural load deserves a final check. Bigger tiles add meaningful dead weight to any floor system, which becomes especially relevant on upper stories. Verify that joist spacing and subfloor thickness can carry the additional mass. A structural engineer can resolve any uncertainty quickly and definitively.
Bringing It Together
There is no single correct answer when it comes to tile size. Standard formats are affordable, approachable, and tolerant of imperfect substrates and developing skills. Larger options produce a sleek, expansive surface with fewer joints to maintain — but they demand a carefully leveled substrate and confident installation technique.
Choosing well requires looking beyond the showroom sample and evaluating the project as a whole. Measure the room, assess the subfloor, and take a straightforward look at your experience level. The right tile is the one that matches the real conditions of your space.