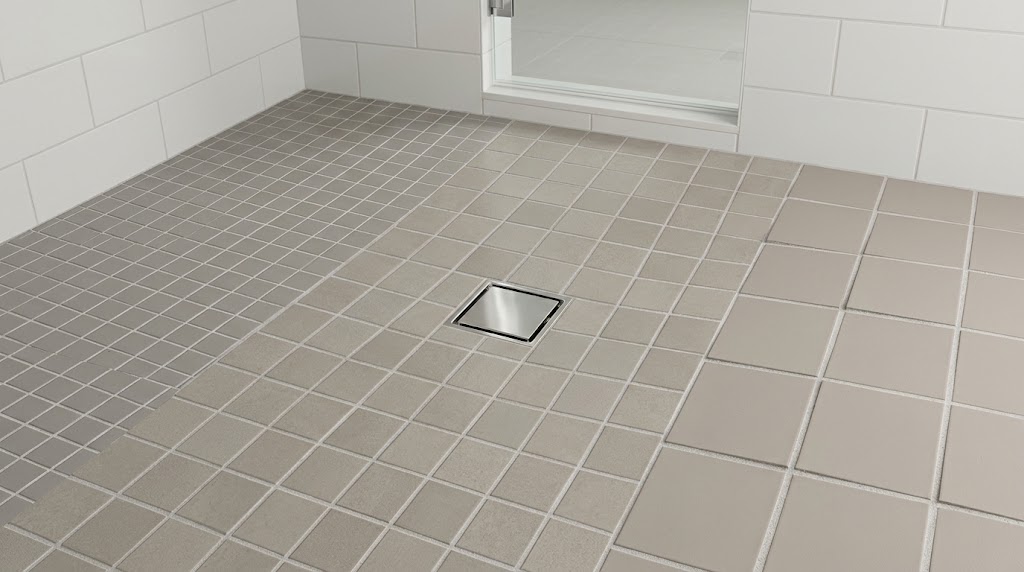
Most people pick a shower floor tile by color first. That is backwards. The size of the piece decides whether the floor drains, grips, and stays flat. Color is a later conversation.
The reason is simple. A shower pan is pitched, and pitched surfaces are unforgiving of large, rigid shapes. Small units bend with the bed, but they span a wide range. One-inch squares and four-inch squares behave nothing alike.
Grout density, traction, cutting, and cleaning all shift with size. So does your tolerance for maintenance. Sorting those factors before you visit a store keeps the project on track.
The Slope Problem and How Mosaics Solve It
Picture the pan as a shallow funnel. Its mortar bed drops about one quarter inch for every foot of run. That pitch pulls water from the wall edge toward the drain.
A single large tile ignores the funnel. A 12×12 sits rigid while the bed curves beneath it. One corner lifts off the mortar and stays there. That raised corner is called lippage.
Lippage causes two separate headaches. A bare toe catches on the raised edge. Behind the edge, water dams up and leaves mineral rings.
Mosaic sheets handle the curve through their joints. Dozens of small pieces sit on one sheet, each separated by a narrow gap. Those gaps act like hinges as the sheet is pressed into the bed. The finished field stays flush and sheds water as intended.
Three Size Categories to Know
Mosaics for floors come in three rough categories. Each one trades curvature tolerance against cleaning effort. Pick the category before you pick the color.
1×1 Inch and Smaller
Squares at one inch, plus penny rounds and small hexes, wrap around nearly any curve. They suit curbless showers that drop steeply to a linear drain. Radiused corners and odd shapes also go smoothly at this scale.
The cost is maintenance. Tiny pieces mean many joints, and joints gather soap film. Hard water lays scale on top of that film within weeks. If scrubbing is not for you, this category will frustrate you.
2×2 Inch
Two-inch squares sit in the middle of the range and cover most jobs. They flex with a quarter-inch fall without lifting at the corners. Their joint count is moderate, so routine cleaning stays manageable.
At a tile shop, two-inch sheets are usually the first thing shown to shower floor shoppers. Installers favor them because they cut cleanly around drains and set fast. For a standard residential pan, they are the sensible default.
3×3 Inch and Larger
Wider pieces reduce joint count and read as a calmer surface. That appeal pulls some homeowners toward three-inch or four-inch squares. On a gentle fall it can work, but the margin is thin.
A four-inch piece on a quarter-inch pitch may lift at one edge. Measure the real fall of your bed before ordering anything. Three inches is the practical ceiling on most residential pans.
Grip Underfoot: Joints and Grout
Falls happen in showers, and tile faces are usually the slick component. What your foot actually grips is the grout joints. More joints per square foot means more traction.
That is one reason mosaic tiles bathroom floors usually sit on the smaller end of the scale. A one-inch sheet is mostly grout and holds a foot very well. Two inches still gives most households plenty of friction. Larger formats start to lose that safety margin.
Surface texture contributes something, but it cannot replace joints. Matte and textured faces are worth specifying on any pan surface. Polished or glossy finishes should stay on walls.
Grout selection follows joint width. Sanded grout is for gaps wider than one eighth inch. Most mosaics use one sixteenth or one eighth inch joints, so unsanded grout is standard. Read the maker’s notes first, since soft stone scratches under sand.
Materials That Survive Constant Moisture
Size controls fit. Material controls how the floor ages in standing moisture. Porosity, hardness, and finish all matter before you order.
Porcelain is the reliable choice on a wet floor. It is dense, drinks very little water, and rejects stains without sealing. The range of colors and finishes is wide. Matte options add grip at the same time.
Natural stone offers variation no factory can reproduce. Travertine, slate, and marble all perform when sealed on schedule. Stone is porous, so it needs sealing before and after grouting, then yearly. Skip that routine and it darkens and grows mildew.
Glass is waterproof and reads clean in modern bathrooms. Its face is slick, so only small formats belong on a pan. Penny rounds and one-inch squares work because joints carry the grip. Verify the floor rating, since thin glass cracks under repeated weight.
Backing Types and How They Affect Setting
Mosaics come mounted on sheets, and the mounting method changes how a sheet behaves. Three types are common on the market today. Each one sets slightly differently.
Mesh backing is the most popular. Tiles are glued to a fiberglass mesh that stays flexible in your hands. Press the sheet into a sloped bed and it drapes to the curve. Irregular pitches and custom drains go more easily with mesh.
Paper facing works in reverse. Sheets install face down and the paper gets soaked off after the mortar sets. The field ends up very flat, with no mesh between tile and mortar to weaken the bond. You cannot see the tiles during setting, so low spots are easier to miss.
Sheets with fused tiles and no open joints are made for walls. A pan needs a joint between every piece so the sheet can flex as the bed curves. Those gaps also give grout somewhere to grip. Fused formats do not belong underfoot.
Whatever the mounting, inspect the sheet before paying. Loose tiles on the sheet become loose tiles on the floor.
Laying Out the Pan
Layout rewards a dry run before any thinset is mixed. Ten minutes of planning keeps joints even and cuts clean.
Work from the drain outward. The drain is the lowest point and the natural center of the pattern. Center the first sheet over the opening and radiate toward the walls. Cuts at opposite walls then balance each other.
Pans are rarely perfectly square, so expect to cut. A standard round drain spans four inches across. Remove the four tiles that sit over the opening and leave a small gap around the flange. The cover hides the cut edges and gives you room to adjust.
At the corners, measure carefully and cut the sheets to fit. Keep joint width identical across the field and at the walls. If the sheet uses one-eighth-inch gaps, hold that gap everywhere. Inconsistent joints read as careless work.
Shopping for Your Materials
Where you buy matters nearly as much as what you pick. A dedicated tile shop tends to employ people who understand slopes, drain assemblies, and floor ratings. That knowledge keeps wall-rated product off your pan. Walk in with measurements and clear questions.
Carry the drain assembly with you. Holding the flange against a mosaic sheet shows how the pieces will sit around the opening. You will know instantly whether the tiles are too large to cut cleanly. One check like that prevents a wasted trip.
Describe the job plainly at the counter. Mention that you need mosaic tiles bathroom flooring rated for a sloped pan, and staff can rule out wall-only options immediately. Vague questions get vague answers.
Ask about backing type as well, since sheets vary in how they bend. A second tile shop can confirm a doubtful pick if the first answer feels thin. That extra visit costs little beside a failed floor.
Order about fifteen percent extra material. Cutting mosaics breaks pieces, and mistakes are part of the job. Spare boxes also guard against dye lot shifts between batches. Color match later is never guaranteed.
Three Checks Before Grout
Even a well-chosen size can show problems once it is set. Three checks catch most of them before grout seals them in place.
Test with water first. Pour a bucket across the pan before grouting and trace the path. Every drop should reach the drain on its own. Standing water means a section must lift so the bed can be corrected.
Feel for lippage second. Run your palm across the field and hunt for raised edges. A single high piece taps down with a rubber mallet. Widespread lift means the mosaic tiles bathroom range you chose was too large for your fall.
Finish at the drain edge. Water crosses that cutout constantly, and rough cuts gather debris over time. Smooth them with a rubbing stone before grouting. Clean edges keep flow moving for years.
Making the Call
The sizing decision rests on geometry and habits, not on color charts. The bed falls toward the drain and the tile has to follow it. For most pans, a 2×2 porcelain square handles grip, upkeep, and setting.
Steeper falls do better with 1×1. If grout cleaning bothers you, 3×3 can work on a gentle slope, but confirm the pitch first. Speak with your local tile shop about floor ratings and backing types before ordering. Measure the drain, buy extra material, and dry-fit the first sheet before mixing anything.
Get the foundation right and the floor drains well for years to come.