
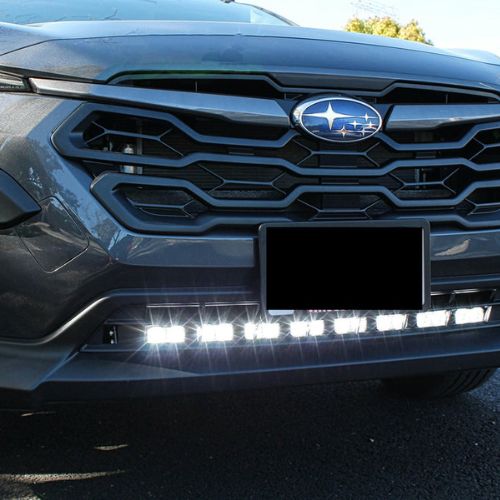
If you drive a Subaru Outback, there’s a good chance you use it the way it was meant to be used: road trips, backroads, camping weekends, maybe a snowy commute or two. And while the Outback’s factory lighting is solid for everyday driving, it can feel a little underpowered once you’re outside well-lit city streets. That’s where a Subaru Outback LED light bar can be a smart upgrade giving you broader visibility, better contrast, and more confidence when the road gets dark.
Below is a friendly, no-fluff guide to choosing, installing, and using an LED light bar on your Outback the right way.
Why Add a Subaru Outback LED Light Bar?
An LED light bar isn’t just about looks (though it can definitely add a rugged vibe). The real value is functional.
Better visibility on dark roads
LED light bars can throw a wider beam than standard headlights, helping you spot hazards sooner—think deer near the shoulder, a curve ahead, or unexpected debris on a forest road.
Useful for outdoor lifestyles
If you’re the type to arrive at campsites after sunset, load gear in dim conditions, or navigate trailheads before sunrise, extra lighting can make your life easier and safer.
Modern efficiency and long lifespan
LEDs are known for drawing less power than many older auxiliary light options and typically last a long time when you buy quality components and mount them properly.
Choosing the Right LED Light Bar for Your Outback
Not all light bars are created equal. The best one for you depends on where you drive, how often you’ll use it, and how you want it mounted.
1) Size: go practical, not oversized
For many Outback owners, bars in the 10″ to 20″ range are a sweet spot—enough output to matter without looking out of place or becoming difficult to mount cleanly. Larger bars can work too, but they usually require more involved mounting solutions.
2) Beam pattern: spot, flood, or combo?
Spot beam: long-distance, focused beam for seeing farther down the road.
Flood beam: wide spread for shoulder visibility and trails.
Combo beam: a balanced mix of distance and width—often the most versatile choice for Outback drivers.
If you do a blend of highway and backroads, combo patterns are usually the easiest “set it and forget it” option.
3) Brightness and color temperature
Many LED bars fall into a cool white range that looks crisp and bright. That said, extremely blue-tinted lights can cause glare in fog, dust, or snow. If you drive in those conditions often, consider options designed to reduce backscatter (sometimes via lens design or selective covers).
4) Build quality matters more than you think
A light bar is exposed to weather, vibration, and road grime. Look for:
- Solid housing and seals
- Strong mounting brackets
- A reputable wiring harness
- Good heat management (cooling fins, quality materials)
Cheap bars can flicker, fail early, or let moisture in—none of which is fun when you’re miles away from town.
Mounting Options for a Subaru Outback LED Light Bar
Where you mount your bar affects performance, wind noise, and overall ease of installation.
Behind the grille (clean and subtle)
A grille-mounted bar often looks factory-ish and stays protected from wind and branches. It’s a popular choice for Outback owners who want extra lighting without a big visual change.
Bumper or lower fascia mounts
This can be a great compromise: strong light output, minimal glare off the hood, and generally less wind noise than roof mounting.
Roof mounting (maximum coverage, more trade-offs)
Roof-mounted bars can illuminate a broad area great for trails and open terrain but they can add wind noise and sometimes reflect off the hood depending on positioning.
Wiring and Installation: Do It Once, Do It Right
Even if the bar itself is simple, installation quality is what separates a clean, reliable setup from a frustrating one.
Use a relay and fused harness
A proper wiring harness with a relay and inline fuse protects your vehicle and reduces electrical headaches. It also helps ensure your light bar gets steady power when you need it.
Switch placement and usability
Choose a switch location you can comfortably reach without taking your eyes off the road for long. Some drivers prefer an OEM-style dash switch for a seamless look.
Aim the bar carefully
Aiming is everything. Point it too high and you’ll create glare (and possibly annoy other drivers). Too low and you won’t get the distance you want. Take time to align it on level ground and test at night.
Quick note: If you’re cross-shopping setups for other trucks too, you’ll see plenty of inspiration from builds like the chevy colorado light bar style installs- clean wiring, sturdy mounts, and practical beam patterns translate well across vehicles.
Final Thoughts: A Bright Upgrade That Fits the Outback Lifestyle
A Subaru Outback LED light bar can be one of the most practical upgrades you make if you drive beyond the glow of streetlights. The key is choosing the right size and beam pattern, mounting it thoughtfully, and wiring it safely so it works every time you flip the switch.
If you want quality parts guidance or a professional install finish, consider connecting with M&R Automotive in the final stretch of your planning for a reliable setup.

